Monday 29 July 2019

Motorized CAT 963D Track Loader with Lego PF and SBrick Control


After installing or modifying a few models, it was the time to take up some challenges.  I chose CAT 963D not only it was related to my work but also there were a few models had been posted in the internet so I could make reference.  Among the several models, Makorol's model posted in 2012 was regarded as the best by many people, but he only posted with 20+ photos and a YouTube video.  Nonetheless, it was better than nothing and I could make reference by counting the number of bricks to measure the dimensions.


In the beginning, I had no clue on how to start but ordering a large number of bricks and plates with different lengths and shapes.  It took me a whole month and a few times to order and have the bricks and plates I needed.
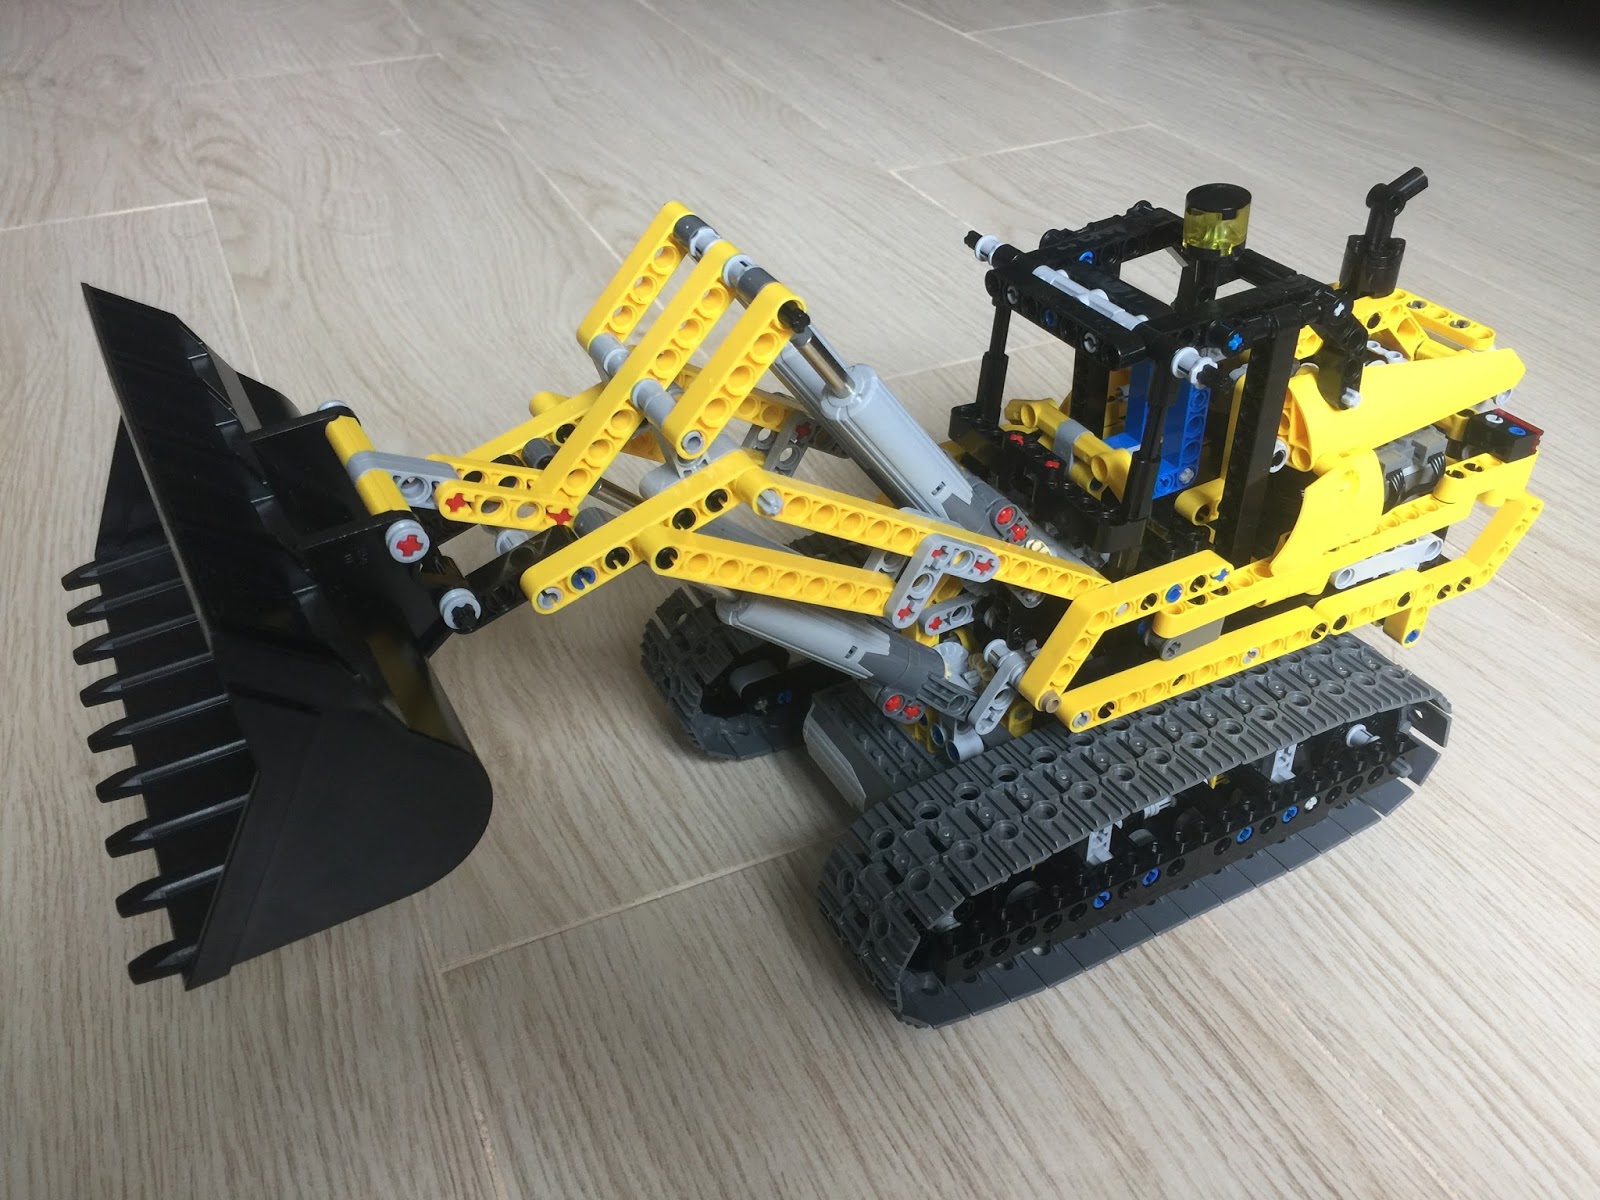

Undercarriage

To make the undercarriage was not difficult as it was similar to those Lego Technic's.  I used two PF motors and one PF controller to control two tracks so that they could turn independently.


Upper Structure & Cab
It was not very difficult as they were not required to be a strong structure.  However making sure you used different shapes of bricks and plates to reinforce the structure and used nail polish if necessary.  


The structure to support the lifting arms' push rods and motors was another story.  Each push rod was driven by a PF motor through a universal joint.  As the push rods were supporting the weight of the lifting arms and bucket, it must be strong and solid, so I used glue to reinforce the structure.  


Lifting Arms & Bucket
It looked very simple but you needed to try different lengths to make a smooth lifting up and down motion.  


IR Remote Control
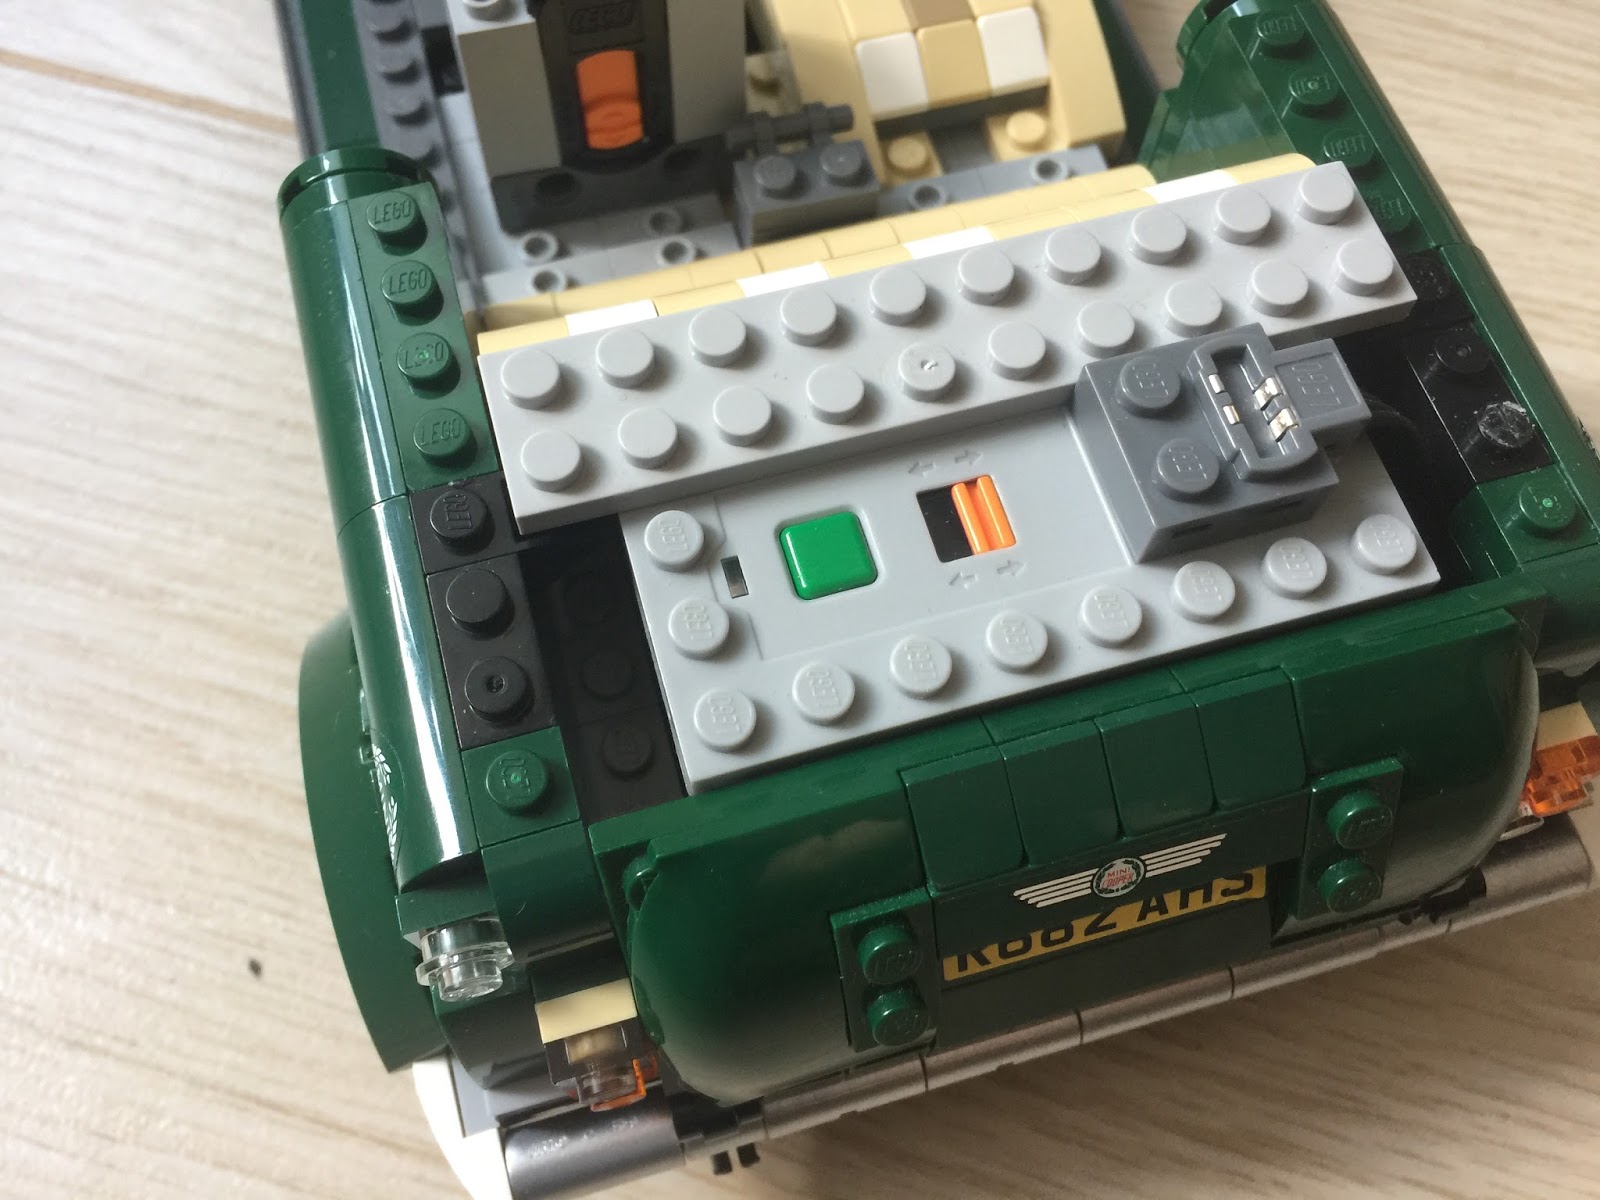
I used two PF remote controllers to control two tracks, lifting arm's up and down, and bucket curling.  To have enough space to house the battery case at the back, I put one PF controller at the front which was beneath the lifting arm structure.  The compact battery case was nicely installed at the back of the engine compartment.  The engine compartment room can be opened to take out the battery case for batteries replacement. 


SBrick Control
As I had a spare SBrick, I later modified the model with SBrick control.


Motorized Excavator with Independently Power Undercarriage & SBrick

The original tracks were powered by two motors in the upper parts of the excavator, through a series of gears.  With power losses through transmission, the tracks moved very slow and didn't want to move when the batteries were half drained.  

As I am using two SBricks, I place one SBrick in the carriage with two motors and battery case.  The tracks are now independently powered regardless, moving smoothly and a little bit faster than I expected.  By separating the upper part and undercarriage, I don't need to replace the batteries so often.


I also modified the SBrick control panel designed by Jurgen.  The original design was to use two sliders to control the forward and backward movement of the tracks.  Due to sensitivity of the control, it was difficult to synchronize the movement.   I replaced the sliders with a joystick in the middle, turning it by 45 degree.  By moving the spot up, both tracks are moving forward.  By moving the spot to left, the left track is moving backward while the right track moving forward making a left turn.  It is easier to control the travel of the excavator now and can have several movements at the same time.


Motorized Excavator with Infrared Remote Control & SBrick

An excavator has six actions: left and right tracks, slewing, boom, stick and bucket.   The original model has only two sets of IR remote control, controlling four motors.  Out of cost control or other reasons, the designer cleverly used the fourth motor as a switch.  The other three motors controlled the left, right track and slewing, by switching the fourth motor, the other three motors were then controlling the boom, stick and bucket.

Of course, some of the enthusiasts would definite not happy about this arrangement and started their own modifications.   Jurgens' modification, using three set of IR remote control and six motors were widely adopted by many people.   You would require to purchase an extra of 180 pirces of parts and power function components to complete the modifications.

Motorized Excavator 8043

This motorized excavator was originally modified by Jurgens. 

Three IR receivers, six motors and one battery case were tightly squeezed into the back of the excavator.

Left controller to control the slewing and stick, right controller to control the boom and bucket.

Middle controller, upside down to control the left and right tracks
Ultimate 8043s

Two SBricks replaced three IR receivers.


SBrick control panel designed by Jurgens.


Motorized Track Loader with Infrared Remote Control and & SBrick

The motorized track loader was originally designed to be controlled by two sets of infrared remote control for four motors, two motors for the track, one for the lift arm and one for the bucket.


The tow receivers were installed at the back o the loader.


The left controller was modified to a joystick type to control the lift arm and bucket.  The two levers of the right control were to control the travel.


SBrick is a blue-tooth device that control the motors via your smart phone.  It can be ordered online at around HK$500 including shipping.  For one set of original Lego IR remote control at around HK$270 per set, it seems the SBrick  is not quite expensive.

First impression was that it looked quite simple and did not worth the money.  The added value using SBRick is by registration, you can design your own control panel, download to your smartphone or simply select some of the public control panels.

By using several SBricks, you can now control very complicated motorized models form your phone.


Motorized Wall-E by Infrared Remote Control & SBrick

The Wall-E is a static model with more than 600 pieces.  In order to be motorized it, you would require one set of infrared remote control and two motors to drive the two tracks.   There are a lot of  instruction and videos online, below is one of them:


The motors were installed at the bottom of the model, the IR receiver was installed at the back and a compact battery case was put inside the model.  For one set of set Lego IR control, two motor sand the battery case, it would cost more than HK$700 including shipping,

SBrick is a blue-tooth device that can control four motors via your smart phone.  It can be used to replace the IR remote control.  You could purchase at around HK$500 including shipping online.   With one set of Lego IR remote control costing more than HK$270,  a SBrick of which can replace two sets of IR remote control,  was not that expensive.  By registration, you can access the SBrick website and design the control panel by yourself or download other public panels.   By using several SBricks, you can use your smart phone to control very complicated models.


Lego Mini Cooper RC Conversion with SBrick

Last time, I used a cheap RC car components to do the conversion.  By knowing the SBrick, a Bluetooth device that can control 4 Lego motors through your smart phone, I purchased one SBrick and one set of Lego IR remote control with two M motors.

The conversion is mainly in three parts:

1.  The Battery Case and Rear Drive – by moving the rear seat one block forward, I could have enough room for the Lego 8111 battery case.  The driven motor was installed in parallel so as to provide room for the battery case.


2.   Front Steering & Return-to-centre Mechanism – most of the conversion will use Lego 88004 servo motor, when cutting off the power, the shaft returned to centre.  As I was not going to invest an expensive servo motor, I searched the Internet and found lot of return-to-centre mechanism to consider.  It consists of a few Lego block and a rubber band. The front steering consists of a linear tooth gear and round gear.


3.     Position of the SBrick – as it is not so big, I could put it in the front compartment.


To look nice, I added a pair of LED front light as well.

The test drive revealed two dissatisfaction.  Due to limited room inside the front wheel compartments, the front steering angle was small thus resulting a larger turning radius.  When controlling two movements through the SBrick, the movements were slow.  It might be caused by small batteries inside the compact battery case, AAAs instead of AAs.


As the SBrick is quite expensive, the price is twice of one set Lego IR remote control, I later changed it to Lego IR remote control.  As the IR received is higher than the SBrick, I needed to modify the front bonnet.  


Lego Mini Cooper RC Conversion

I am not a fan of Lego but fascinating about people using different shape and colour of Lego blocks to create huge structures and models.  In memory of the old Mini that I had driven for a short period of time when I was studying in UK, I purchased a Lego Mini Cooper model box.


It consists of more than 1,000 pieces of blocks with two books of instruction.  It took me almost 6 hours to complete the installation.  Without the instruction books, I admitted that I would not be able to complete the installation.  No wonder this Mini Cooper model is suitable for age 16+.


Apart from cycling, my other hobby is to do RC conversion for large scaled model.  The size of this Mini Cooper is definitely worthy to give it a try.  The simple way to do the conversion is to buy a similar sized RC model car and transfer all the motors, controller and battery case. 

Firstly, I needed to move the upper part of the complete model to a Lego board and review whether there is enough room to house the above components on the chassis.  Eventhough, I had completed the installation before, it took me two painstaking hours to do the transfer.  It reviewed that I might have enough room to do so.


Secondly, I have to transfer the chassis to a Lego board, cut into shape as per the original.  The board would give enough strength to support as the original chassis of which were made of long and thin Lego blocks and plates. 

Thirdly, I purchased a cheap Chinese made imitation of Lego block RC car and used the driving, steering and remote control components for the conversion.  I purchased another set for my sister-in-law’s son, while I retained the chassis, he could have two sets of blocks for one chassis.


Fourthly, I cut the chassis into pieces, with cutting and drilling, and assembled the steering, driving and remote control on the Lego board.  As these components were larger than I expected, I anticipated that I would have difficulties putting back the upper part of the model.


Finally, the upper part was put back on the chassis.  I required to cut some of the blocks obstructed by the bolts and nuts, motors, etc.  It was another painstaking few hours.


The test drive has shown that the Mini Cooper runs smoothly most of time.  But because the model was not designed to turn, front wheel compartment’s space was very limited and the turning radius was only 15 degree instead of 30 degree.  However, I had lot of fun doing the conversion and look forward to having another project.


Lego Technic Wheeled Excavator MOC

Every few years, I will plan a new project, the last one was the motorized CAT 963D Tracked Loader. You can click the link if interested:  ...